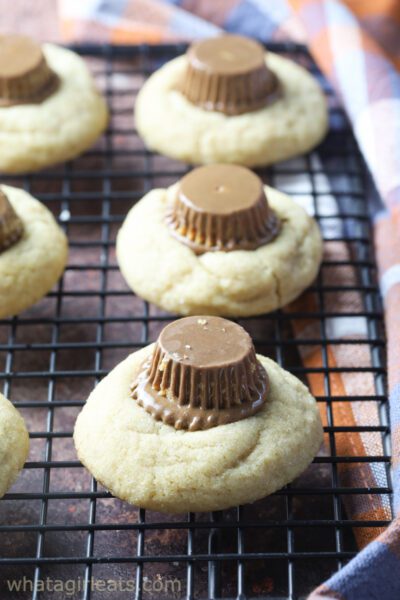
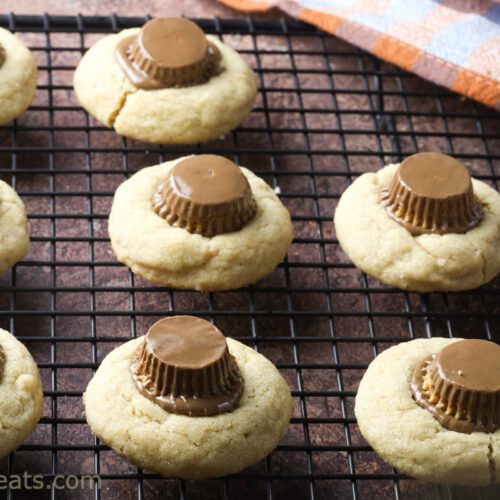
Peanut Butter Cup Cookies
As an Amazon Affilate, I earn commission on qualifying purchases.

Peanut butter cup cookies are the perfect treat for peanut butter lovers. This is the traditional recipe for old fashioned peanut butter blossoms using Reese’s peanut butter cups instead of a Hershey’s kiss. While these are a great cookie for the holiday season or cookie exchanges, I’ve also included a variation to make these into cute spiders for Halloween. (This post was originally published on October 5th, 2016)

Ingredients for peanut butter cup cookies
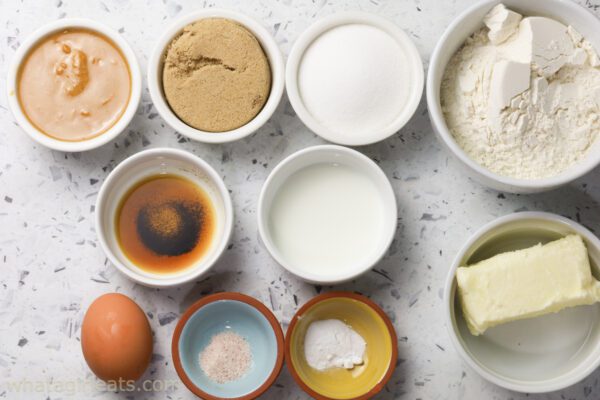
- 1/2 cup unsalted butter, softened
- 1/2 cup dark brown sugar
- 1/2 cup white sugar
- 1 large egg
- 1/2 cup creamy peanut butter
- 2 Tablespoons milk
- 1 teaspoon vanilla extract
- 1 3/4 cup all-purpose flour
- 1 teaspoon baking soda
- 1/2 teaspoon salt
- 36 mini Reese’s peanut butter cup
- 1/4 cup sugar to roll the cookie dough in.
How to make peanut butter cookies
- Pre-heat oven to 375 degrees F.
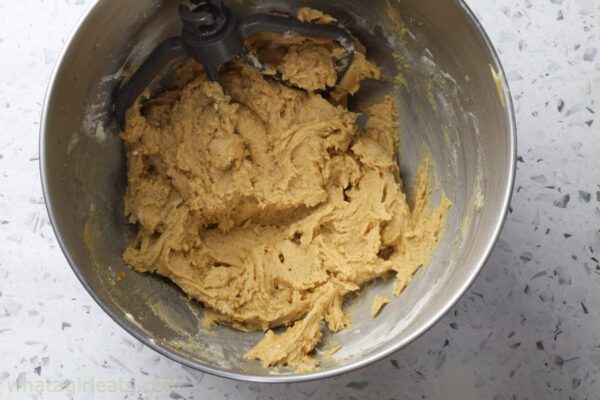
- In the bowl of a stand mixer, fitted with the paddle attachment, cream butter, brown sugar, and 1/2 cup white sugar until blended, light and creamy, about 3 minutes.
- Scrape down sides of the bowl, then add egg, 1/2 cup peanut butter, milk and vanilla, and beat until well blended, 1-2 minutes.

- In a medium sized bowl, mix flour, salt and baking soda. Slowly add flour mixture to butter and sugar, just until dough comes together. Don’t over mix. For best results chill dough 30 minutes, or over-night.
- Roll each ball of dough into the size of a walnut, about 1 Tablespoon. Or weigh the dough, and divide the measurement by 36, for uniform cookies. Cookie dough can also be frozen at this stage.
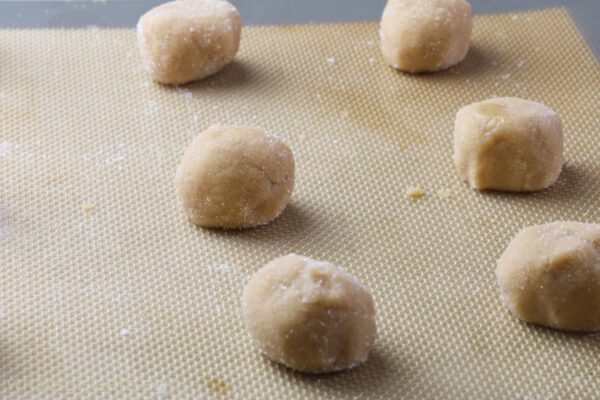
- Roll each ball additional sugar, then place on a baking sheet lined with parchment paper or a silpat.
- Bake at 375 degrees F. for 10-12 minutes, until light golden brown, but still soft.
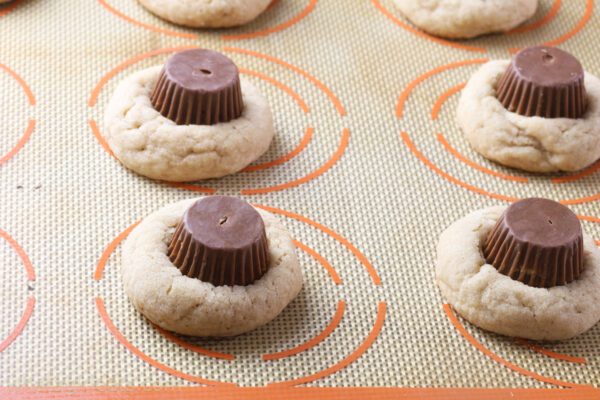
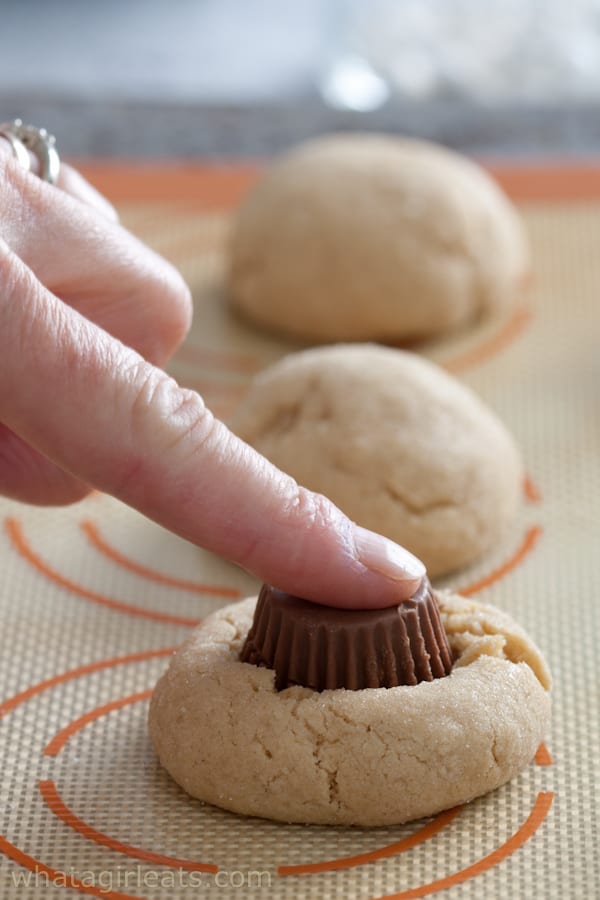
- Remove from oven. Allow the cookies to cool about 3-5 minutes, then place a Reese’s cup in the center of each cookie, pressing down slightly. Allow cookies to cool completely on a wire rack.
- Store baked cookies in an airtight container.
Tips for making peanut butter cup cookies
After mixing your ingredients and making the peanut butter cookie dough, follow these tips so the cookies come out perfectly.
Weigh the dough
- While you don’t have to do this, I like to weigh the dough for consistency in cookie size, and I use grams when weighing for a more precise measurement.
- Another reason I weigh this particular cookie is so there are enough peanut butter cups to cookies.
This kitchen scale is less than $15 and has over 90,000 5-star reviews.
Chill the cookie dough
- With most cookie recipes, I find chilling the dough for half an hour to overnight results in a better cookie.
- You can either chill the dough before you roll them or after.
Unwrap all the peanut butter cups ahead of time
- Keep the unwrapped peanut butter cups chilled until ready to use if it’s a particularly warm day.
- Once the cookies come out of the oven, you’ll need to work quickly to press each peanut butter cup into the warm cookies.
- You could enlist a little helper, provided you don’t lose half of the peanut butter cups in the process!
Under-bake the cookies slightly
- I err on the side of slightly under-baked. You’ll want the cookies to be soft enough for the cup to sink into the warm peanut butter cookies.
- If they are over-baked, they will crumble when you press the peanut butter cup into the cookie.
- Wait about 3-5 minutes for the cookies to cool to prevent the peanut butter cups from melting too much though.
Can I freeze peanut butter cup cookies?
Yes! You can freeze the dough after you’ve rolled it into balls, or you can freeze the finished cookies.
If you’re planning on freezing the dough, skip the final roll in sugar. Freeze them flat on a cookie sheet. When completely frozen, transfer into a zip-lock bag. The dough should be used within three months.
If you’re planning on freezing the finished cookies, wait until they are completely cool. Lay them flat on a cookie sheet and freeze until the chocolate is hard, then transfer to a zip-lock bag or other freezer safe container.
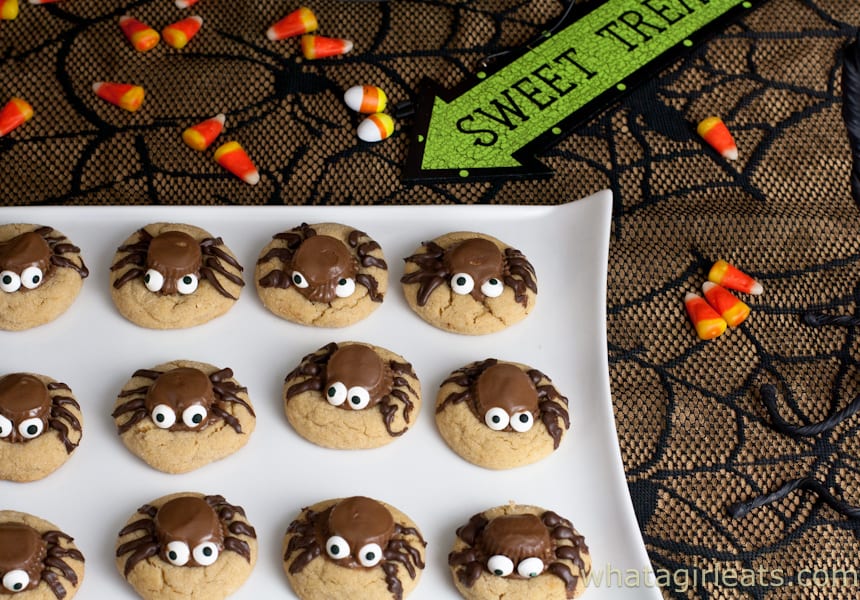
Peanut butter cup spider cookies
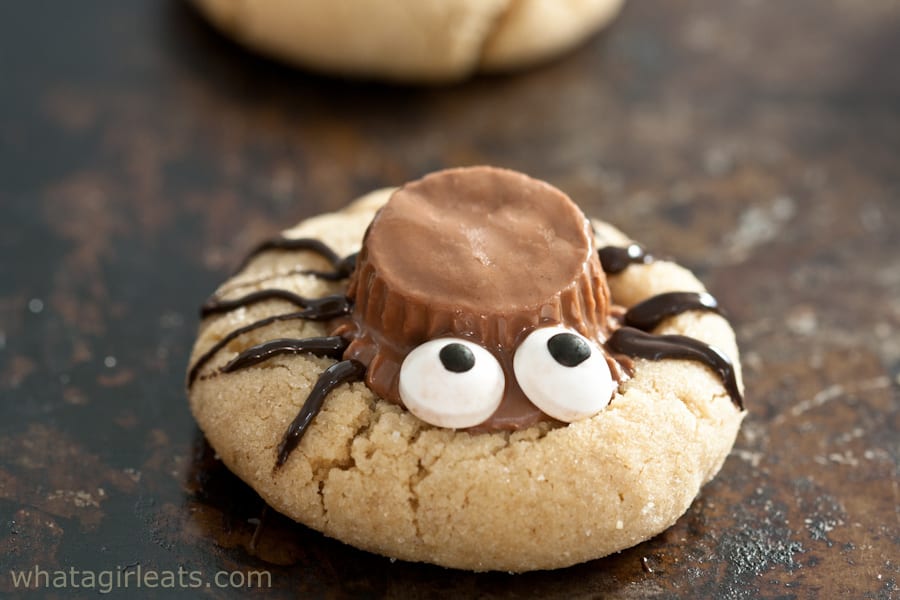
This is an easy cookie recipe to make with children. They are just the right amount of festive for Halloween, with the addition of eyes and legs.
To make the spider cookies, you’ll need:
- 1/2 cup semi-sweet chocolate chips for the legs.
- Candy eyes
While chocolate is still warm, attach candy eyes. I add all the peanut butter cups first, and then go back and press the eyes into the warm chocolate.
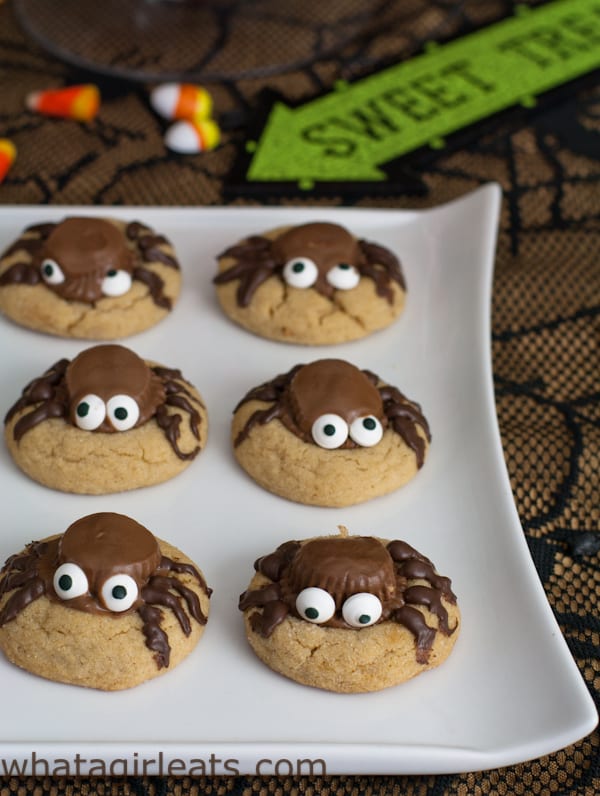
- In a small bowl, melt chocolate morsels in the microwave at 30 second intervals, until chocolate is melted. Pour chocolate into a small ziploc bag. Snip off a tiny corner and drip 8 legs on each spider cookie. The chocolate acts like glue and helps adhere the eyes to the cookies.
- Chill again. You don’t have to chill the cookies again, but I find it easier to add the spider legs after the cookies are completely cooled.
Here are some more of my favorite cookies and holiday treats perfect for holiday parties or cookie exchanges.


Brown Sugar Shortbread Acorn Cookies


Peanut Butter Cup Cookies
Ingredients
- 1/2 cup butter softened
- 1/2 cup light brown sugar
- 1/2 cup white sugar
- 1 large egg
- 1/2 cup creamy peanut butter
- 2 Tablespoons milk
- 1 teaspoon vanilla
- 1 3/4 cup all-purpose flour
- 1 teaspoon baking soda
- 1/2 teaspoon salt
- 36 miniature peanut butter cups
- 1/4 cup sugar
Instructions
- Pre-heat oven to 375 degrees F.
- Using a stand mixer fitted with the paddle attachment, cream butter, brown sugar and 1/2 cup white sugar until blended, light and creamy, about 3 minutes.
- Add egg, 1/2 cup peanut butter, milk and vanilla, and beat until well blended, 1-2 minutes.
- In a medium sized bowl, mix flour, salt and baking soda. Slowly add flour mixture to butter and sugar, just until dough comes together. Don't over mix. For best results chill dough 30 minutes, or over-night.
- Roll dough into walnut-sized balls, about 1 Tablespoon. Or weigh the dough and divide the measurement by 36 for uniform cookies. Cookie dough can also be frozen at this stage.
- Roll each ball additional sugar, then place on cookie sheets lined with parchment or silpat.
- Bake at 375 degrees F. for 10-12 minutes, until light golden brown, but still soft.
- Remove from oven. Allow the cookies to cool about 3 minutes then place a peanut butter cup in the center of each cookie, pressing down slightly.
Notes
- For spider cookies: While chocolate is still warm, attach candy eyes.
- In a small bowl, melt chocolate morsels in the microwave at 30 second intervals, until chocolate is melted.
- Pour chocolate into a plastic sandwich bag. Snip off a tiny corner and drip 8 legs on each spider cookie. Chill until chocolate sets.
Nutrition
(This post was originally published on October 29th, 2015 and has been updated to contain nutritional information.)

These are ADORABLE, Cynthia! What a great idea!!! I’m sure everyone at the party will love these!
I made these cookies and learned a few things along the way. Do NOT immediately put the peanut butter cups into the hot cookies from the oven as they literally start to melt-wait at least 5+ minutes to place the “cups” into the cookies. There’s still plenty of time for the chocolate to melt into the cookies and make placing the eyes much easier. The melted chocolate “legs” are a real mess and found Wilton black cookie icing makes much easier and thinner legs. The cookies are so cute, as well as delicious. Will make again before Halloween and use the things I have learned and will make for much nicer, less messy cookies.
thanks for your tips. I found you really need to put the peanut butter cups fairly quickly before the cookies set up. Using a very thin tip helps with the legs. I prefer chocolate to black icing, but it sounds as though it worked well for you.
These are too cute!! What a great idea. I’m sure they were a hit at your Halloween party!!
these are just too cute!!
I just love these! They are almost too cute to eat! ALMOST…. I can’t resist Reese’s!
I just love these! They are almost too cute to eat! ALMOST…. I can’t resist Reese’s!
These are too cute! Have fun at the party!
Oh they are brilliant, we’d love to make these and peanut butter is always a winner. Mich x
so glad you like them Michelle!
Peanut Butter Cup amazing recipe for Halloween. REally love this recipe so easy to make it. I gonna try today
Peanut Butter Cup amazing recipe for Halloween. REally love this recipe so easy to make it. I gonna try today. So delish
These are so cute and they look yummy! Mmm can’t go wrong with peanut butter! Thanks for sharing! Can’t wait to try them!
These are absolutely adorable! These are wonderful for the Halloween occasion!
These are so adorable and delicious looking! I am loving these and I am actually getting ready to bake cookies so maybe I will have to try this recipe as well 🙂 Thank you for sharing and pining next 🙂
I had seen them on Facebook and fell in love with them, so beautiful it is a shame to eat them!
This is such a fabulous idea! I know my kids will be excited to bake these with me for Halloween as we often bake treats to celebrate
These are absolutely adorable and are so fun to make for the holiday! Kids and adults will love these!
Wish I had read the comment about waiting about 5 minutes before put the peanut butter cup on. They melted and ran everywhere. They look like a mess. I will make them again but wait to put on the peanut butter cup and decorations.
So sorry! I’ll add that tip to the instructions.
These cookies are easy and delicious.
Thanks so much!
Delicious!